Installing CLICK DRAIN™ — The Customisable Modular Drainage System for Fast, Precise Installation
CLICK DRAIN™ is Australia’s stainless steel, customisable modular drainage solution designed for builders, architects, developers, plumbers, facility managers, project managers, and homeowners/renovators who need accuracy, speed, and long-term durability. Engineered as a stainless steel channel drain with click-together components, it delivers precise layouts and clean lines while meeting the demands of modern sites. With heel-safe stainless steel drainage grates, robust outlets and sump pits, and a suite of modular accessories, CLICK DRAIN™ is a professional-grade system that balances performance with a refined finish.
Where typical trench drains lock you into rigid runs, CLICK DRAIN™ makes custom drainage easy. Configure custom strip drains using 1 m and 2 m sections with 100 mm or 200 mm clear openings, click on joiners and corners (45°, 90°, or custom angles), and connect to outlets or sump pits—all with flexible, watertight sealing. The stainless steel body is lighter than polymer concrete for easier handling, acts as formwork during pours, and maintains tight tolerances (±2 mm) for straight, seamless lines. On-site changes are simple: cut with conventional tools, reconfigure later, and finish with your choice of steel grates for drainage, including premium Brass, Gold, or Laser Printed options.
From pools and landscapes to apartment blocks and commercial precincts, CLICK DRAIN™’s modular drainage architecture adapts to virtually any brief. It’s also being installed at scale on the Sydney Fish Market redevelopment, where over a kilometre of CLICK DRAIN™ is specified for performance, hygiene, and aesthetics—proof that a stainless steel drainage grate system can be both construction-friendly and design-led. In the sections that follow, you’ll find a detailed planning and installation workflow, load class guidance, a head-to-head comparison table, and an FAQ to streamline specification and on-site delivery.
Installing CLICK DRAIN™ — The Customisable Modular Drainage System for Fast, Precise Installation
Click Drain™ is purpose-built for custom drainage layouts that demand speed, precision, and flexibility. As a stainless steel channel drain with click-together components, it lets you configure custom strip drains to exact lengths and geometries—even on complex sites—while maintaining the structural integrity and visual consistency specifiers expect. Whether you’re coordinating a commercial façade, a pool surround, or an apartment podium, CLICK DRAIN™’s modular drainage architecture allows you to adapt, extend, or re-route with minimal disruption.
Because the system is engineered from stainless steel, it provides the reliability and hygiene performance needed in public, food-adjacent, and high-traffic environments. The heel-safe stainless steel drainage grate options deliver slip resistance without compromising aesthetics, and the system’s tight tolerances help you achieve clean, straight lines across long runs. Combine this with lighter handling than polymer concrete, and you’ve got a solution that saves time on-site while elevating finish quality.
Modular by Design, Custom by Default
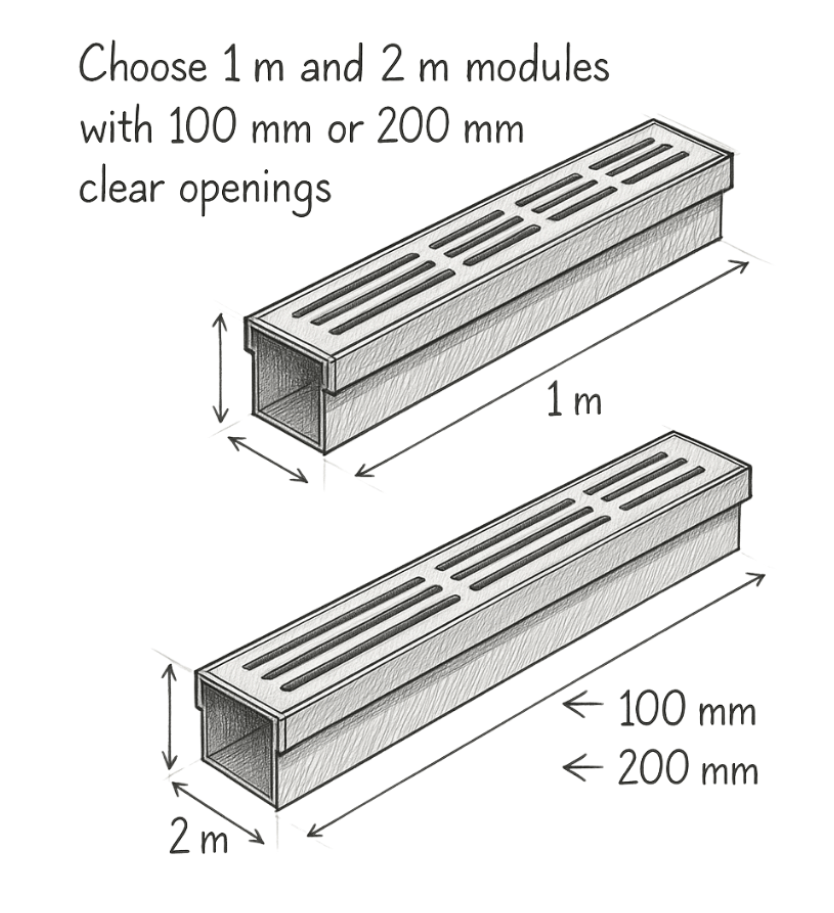
CLICK DRAIN™’s modular toolkit gives you the freedom to design for the site rather than forcing the site to fit the system. Choose 1 m or 2 m channel sections with 100 mm or 200 mm clear openings, then add joiners, 45°/90° corners, T-sections, outlets, end caps, and sump pits to suit your plan. If the last piece needs trimming, channels can be cut with conventional tools for a perfect, millimetre-accurate finish.
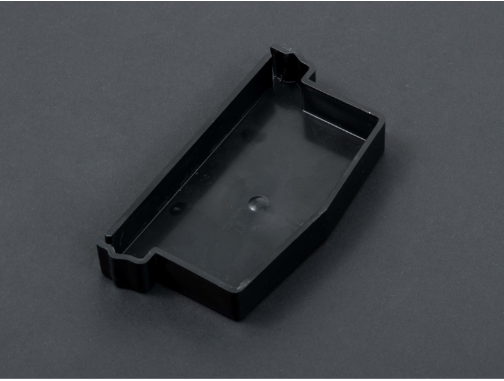
Actual Picture of End Cap
Because the system clicks together, you can stage installation around other trades, make late design changes, or expand later as usage changes. This future-proof approach to modular drainage means you can deliver today’s brief—and reconfigure tomorrow—without ripping out entire runs.
Engineered Stainless Steel Performance
Stainless steel construction resists rust and decay in wet, acidic, or alkaline conditions, supporting long service life with fewer call-backs. Non-porous surfaces improve hygiene by minimising bacteria harborage, making CLICK DRAIN™ ideal for hospitality, food markets, healthcare, and public realms where cleanliness matters.
In Australia’s intense heat and variable climates, stainless steel maintains structural integrity without warping or cracking. Combined with slip-resistant, heel-safe steel grates for drainage, the system performs consistently in indoor and outdoor applications, from plazas to plant rooms.
Faster, Straighter Installs with Fewer Errors
Click-together sections, accurately folded and laser-cut to a ±2 mm straightness tolerance, help crews maintain alignment over long runs and complex turns. Edge rails with underside attachment points, leveling tags, and concrete ties give installers precise height and lateral control, streamlining setup and pour.
Because the channels are significantly lighter than polymer concrete, handling and staging are easier—often a one-person task. The self-supporting design can act as formwork, saving time on site and enabling premium finishes such as polished concrete or tight tile transitions with a consistent 2 mm set-down.
Grating Choices and Premium Finishes

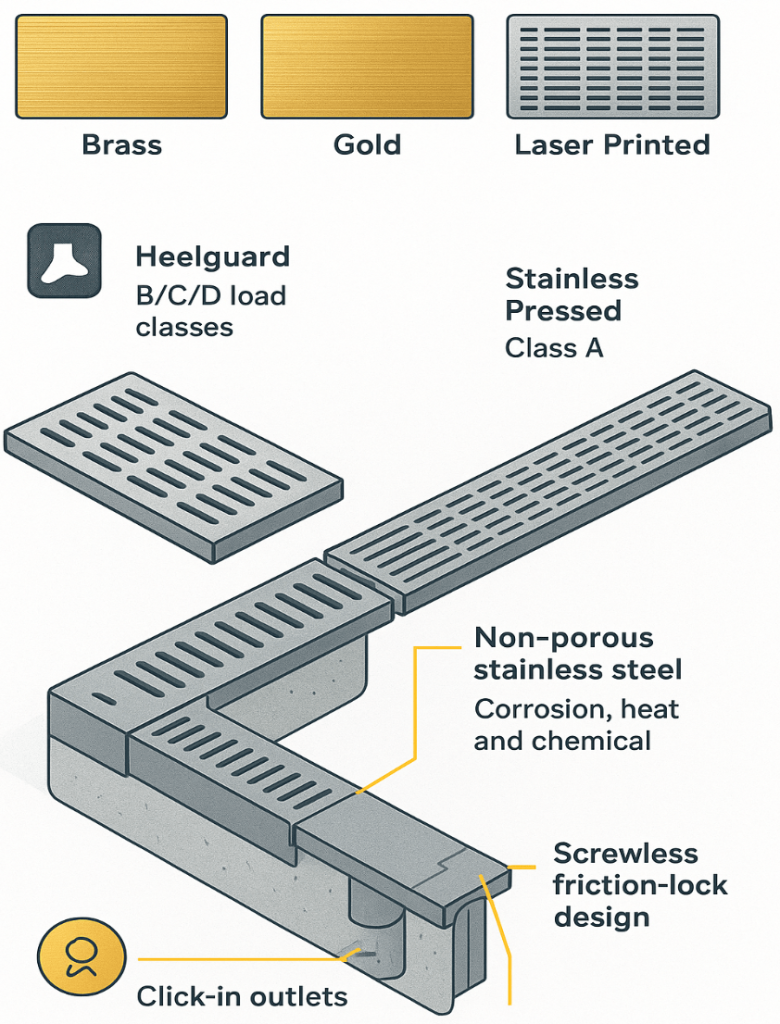
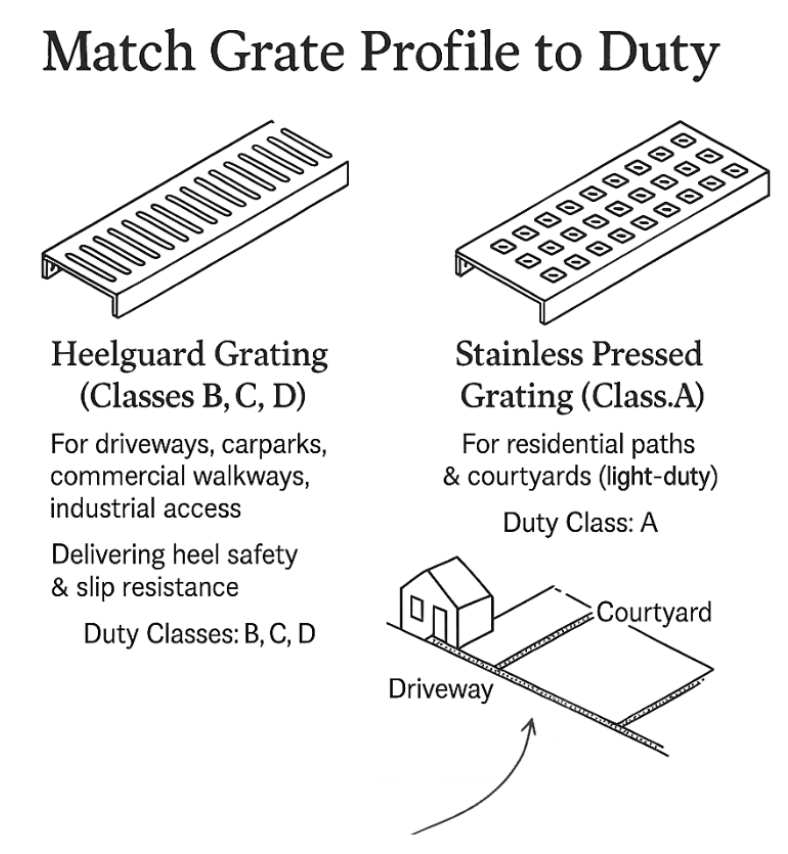
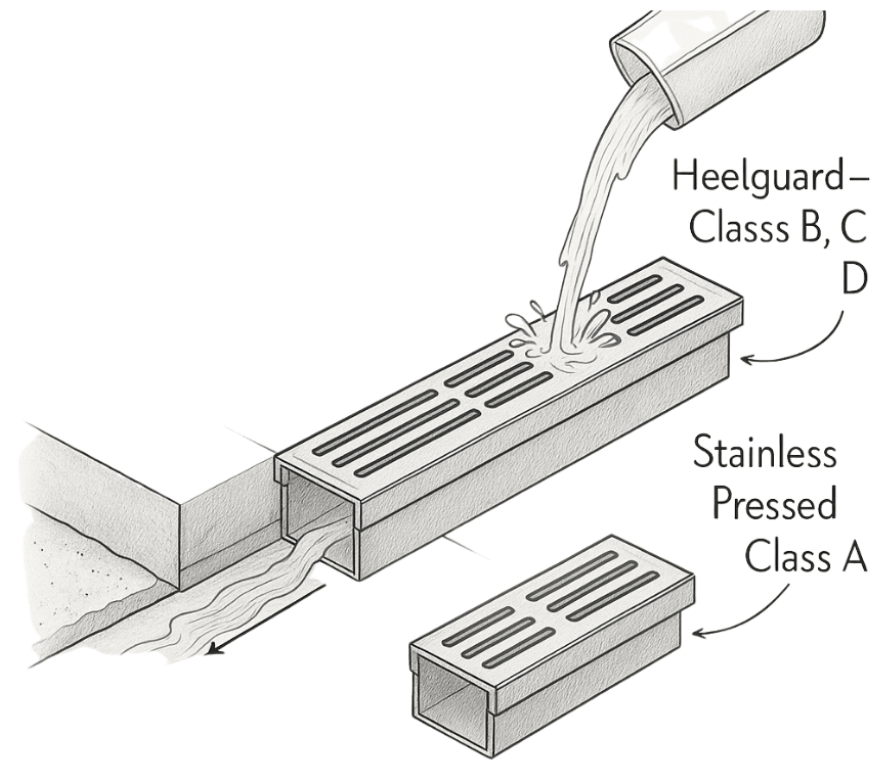
Select heel-safe Heelguard grating for load classes B, C, and D in pedestrian, mixed-traffic, and heavy-duty zones, or choose Stainless Pressed grating for Class A, light-duty pedestrian areas. This flexibility lets you tailor the stainless steel drainage grate to the usage and aesthetic of each zone within a project.
Built for Australia, Backed by Sustainability
Crafted with pride in Australia, CLICK DRAIN™ is engineered for strength and longevity under high impact and heavy loads. The system withstands harsh site conditions and frequent traffic common in shopping centres, streetscapes, and industrial environments—without the cracking, warping, or rust seen in lesser materials.
Stainless steel is recyclable and often contains reused content, supporting sustainability goals while delivering lifecycle value. Effortless upkeep—thanks to friction-lock grates that lift without screws—helps facilities teams maintain peak performance with minimal downtime.
Specs at a Glance
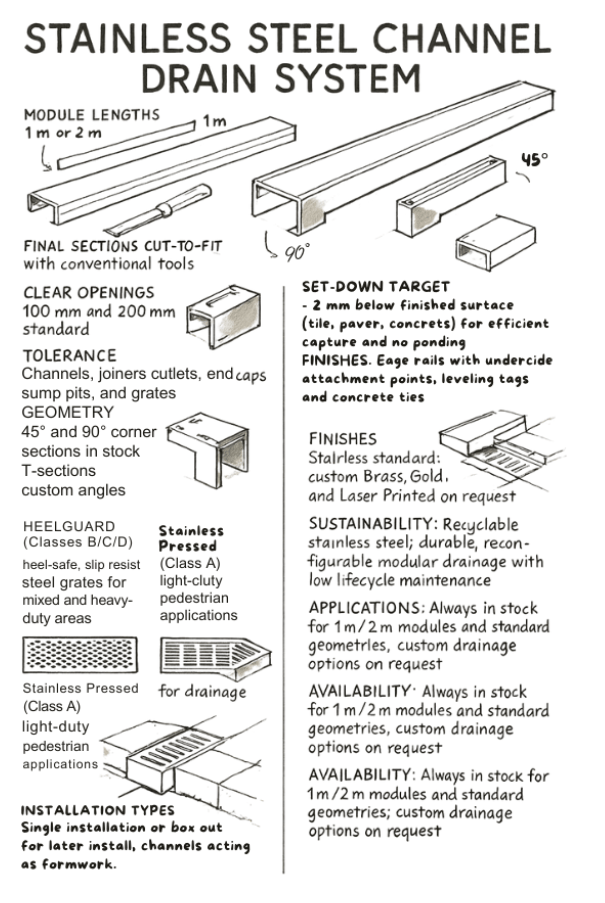
Engineered as a stainless steel channel drain with click-together precision, CLICK DRAIN™ delivers modular drainage that’s fast to specify and faster to install. Channels are laser-cut and accurately folded for straight, seamless runs, supporting custom strip drains that align cleanly along façades, thresholds, and landscaped edges. With 1 m and 2 m modules, standard clear openings of 100 mm and 200 mm, and on-site cut-to-fit capability, you can tailor lengths and layouts without compromising build quality.
Grating options include heel-safe Heelguard for B/C/D load classes and Stainless Pressed for Class A, ensuring the right stainless steel drainage grate for every zone—from light pedestrian paths to heavy-duty service yards. Premium finishes (Brass, Gold, Laser Printed) elevate design intent, while the non-porous stainless construction resists corrosion, heat, and chemicals. In stock and ready to go, components integrate with standard plumbing via click-in outlets and are supported by a maintenance-friendly, screwless friction-lock grate design.
- Material: Stainless steel channel drain system; non-porous, corrosion-resistant, hygienic
- Module lengths: 1 m and 2 m; final sections cut-to-fit with conventional tools
- Clear openings: 100 mm and 200 mm standard
- Tolerance: Laser-cut, accurately folded sections for straightness within approx. ±2 mm
- Geometry: 45° and 90° corner sections in stock; T-sections and custom angles available
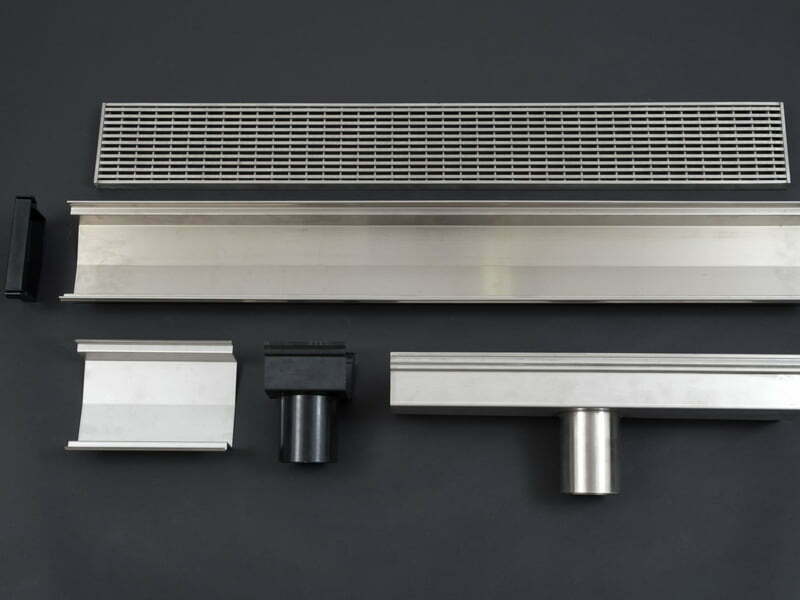
- Components: Channels, joiners, outlets, end caps, sump pits, grates (Heelguard, Stainless Pressed)
- Grating options:
- Heelguard (Classes B/C/D) — heel-safe, slip-resistant steel grates for drainage in mixed and heavy-duty areas
- Stainless Pressed (Class A) — light-duty pedestrian applications
- Installation types: Single installation or box-out for later install; channels can act as formwork
- Set-down target: ~2 mm below finished surface (tile, paver, concrete) for efficient capture and no ponding
- Securing and alignment: Edge rails with underside attachment points; leveling tags and concrete ties
- Finishes: Stainless standard; custom Brass, Gold, and Laser Printed on request
- Sustainability: Recyclable stainless steel; durable, reconfigurable modular drainage with low lifecycle maintenance
- Applications: Pools, landscapes, apartment podiums, commercial precincts, driveways, façades, service yards; over a kilometre specified for the Sydney Fish Market redevelopment
- Availability: Always in stock for 1 m/2 m modules and standard geometries; custom drainage options on request
Planning a Custom Configuration
Before you start cutting concrete or setting screeds, build a clear plan that exploits the strengths of a customisable, modular drainage system. CLICK DRAIN™’s stainless steel channel drain modules, joiners, corners, and outlets let you assemble custom strip drains that match your site geometry and performance requirements without over‑engineering. Good planning reduces onsite friction, accelerates installation, and ensures your stainless steel drainage grates align perfectly with adjacent finishes.
Approach planning zone by zone. Define falls, choose outlet positions and pipe connections, confirm load classes, and map how each run interfaces with tiles, pavers, or concrete. With CLICK DRAIN™, you can future‑proof layouts for reconfiguration, so think beyond day one and allow for potential extensions or changed traffic patterns.
Choose the Right Installation Method
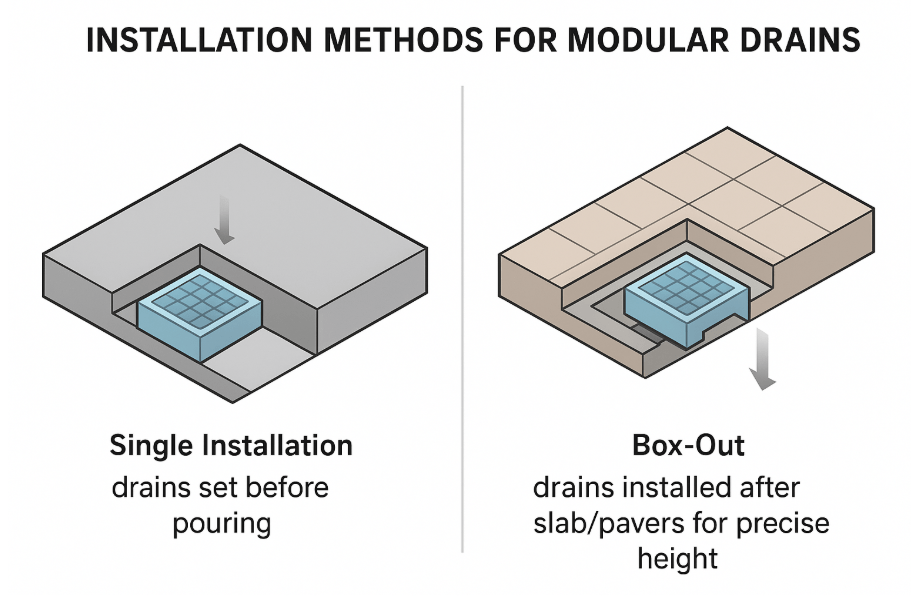
Select between Single Installation and Box‑Out for Later Installation based on program and trade sequencing. Single Installation suits straightforward pours where drains can act as formwork, accelerating progress and helping achieve crisp, straight edges.
Box‑Out is ideal when you want to pour slabs or set pavers first, then drop the modular drainage in later for precision height control. This method is particularly useful in complex commercial programs or when coordinating multiple trades where late layout changes are likely.
Map Layout, Falls, and Outlet Locations
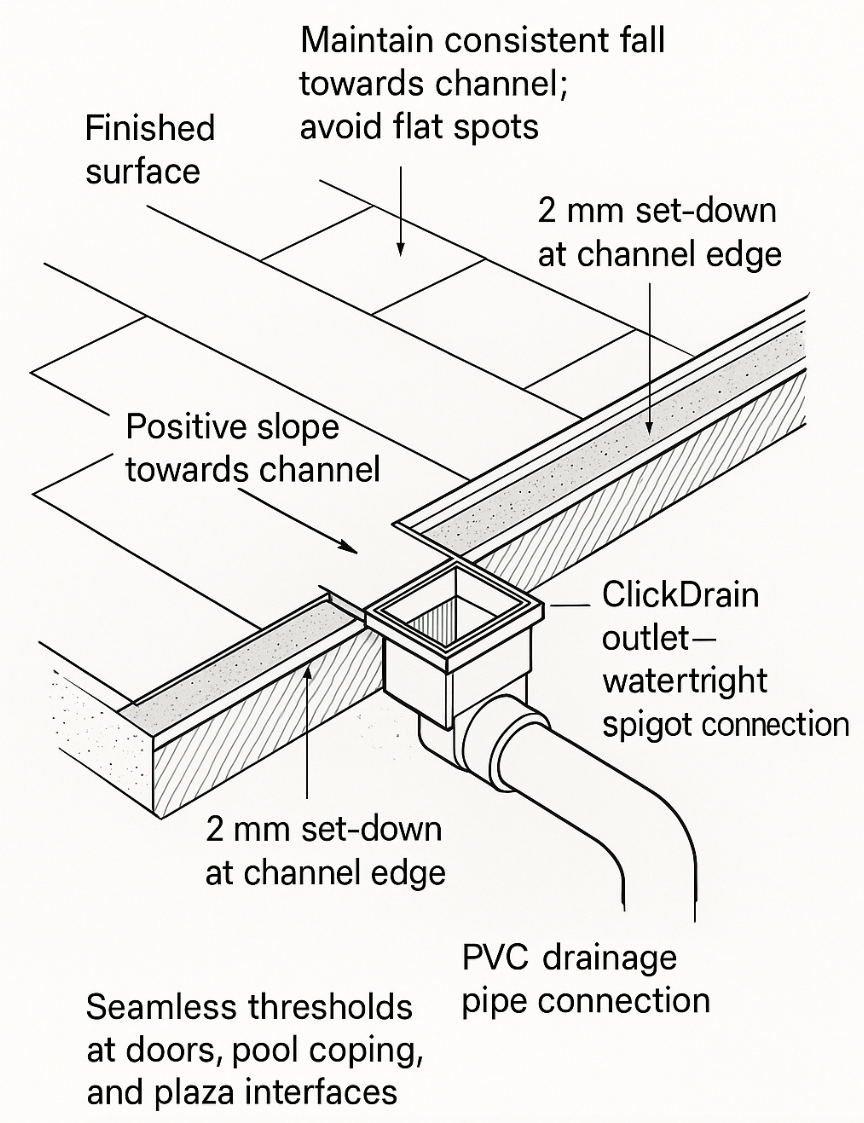
Start with a clear drainage path and consistent fall. As a practical guide, target a positive slope and maintain the channel edge approximately 2 mm below the finished surface to capture runoff efficiently and avoid ponding. This set‑down is critical for seamless thresholds at doors, pool coping, and plaza interfaces.
Position outlets to minimise pipe runs and conflict with other services. CLICK DRAIN™’s click‑in outlets let you core the channel with an ion‑free or bi‑metal hole saw and snap the spigot in place, creating a watertight and robust connection to PVC or site drainage.
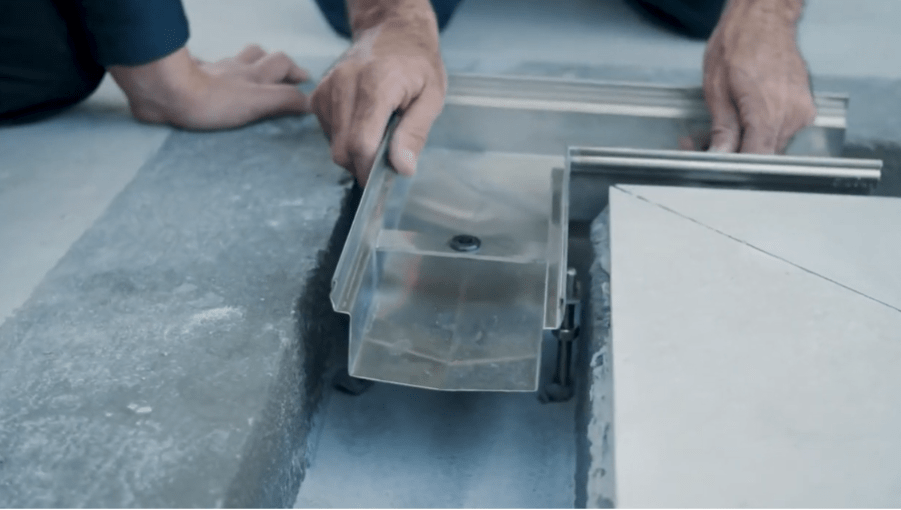
Select Modules, Geometry, and Cut Points
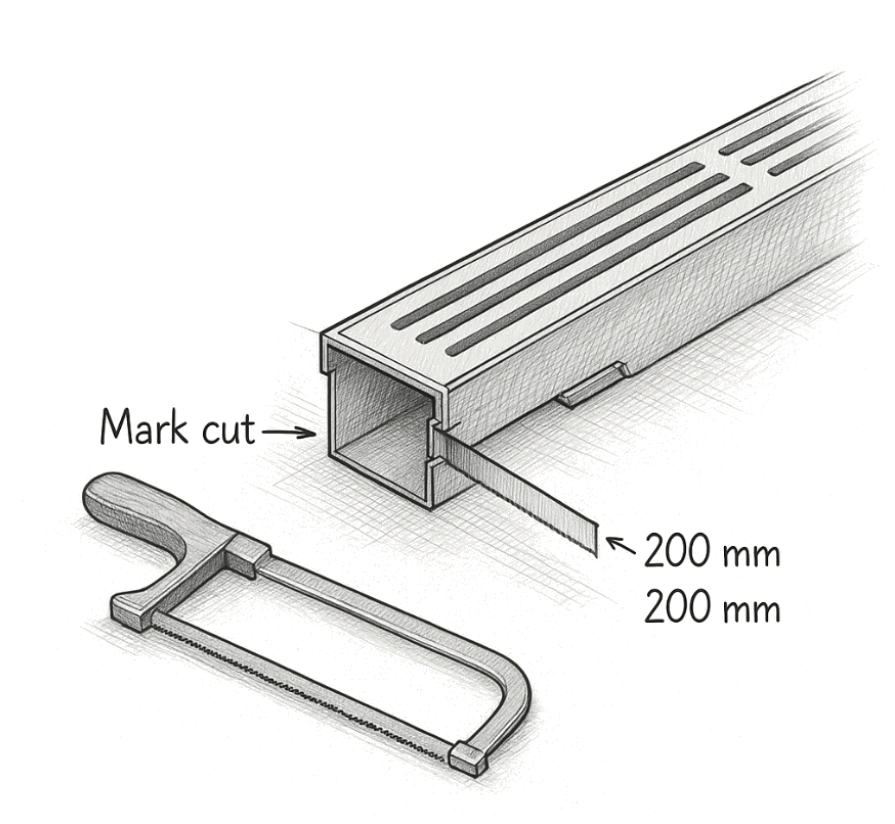
Dry‑lay runs and mark any cuts—CLICK DRAIN™’s stainless steel sections can be trimmed with conventional tools and deburred for a clean finish, supporting millimetre‑accurate custom drainage.
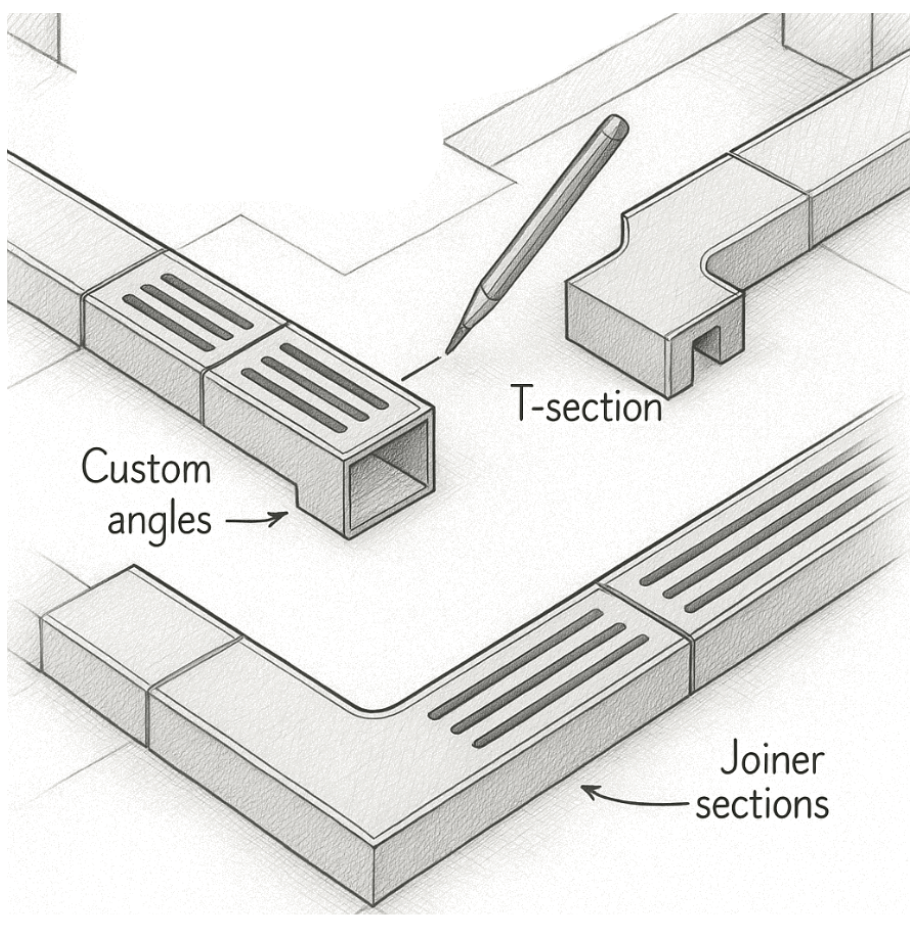
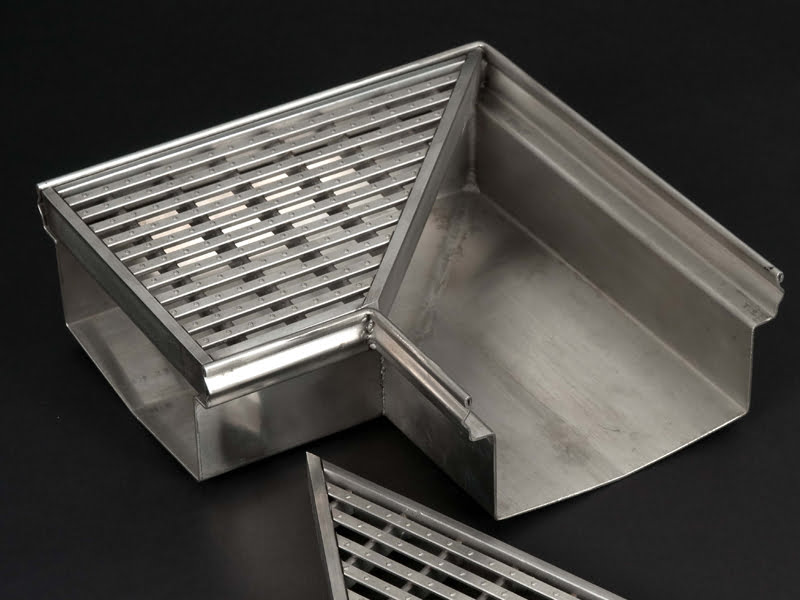
Use 45° and 90° corner sections, T‑sections, and custom angles to mirror site geometry around façades, planter edges, and pool surrounds. Joiner sections create long, straight lines with tight laser‑cut tolerances, helping installers maintain alignment over extended runs.
Specify Grating and Load Class by Zone
Match the grate profile to the duty. Heelguard grating suits Classes B, C, and D for driveways, carparks, commercial walkways, and industrial access—delivering heel safety and slip resistance for public areas. Stainless Pressed grating is Class A for light‑duty pedestrian zones such as residential paths and courtyards.
If in doubt, specify the heaviest credible load for the area to protect lifecycle value. This zoning approach ensures the right steel grates for drainage are used where they matter most, while preserving a consistent aesthetic across the project.
Detail Interfaces, Encasement, and Finishes
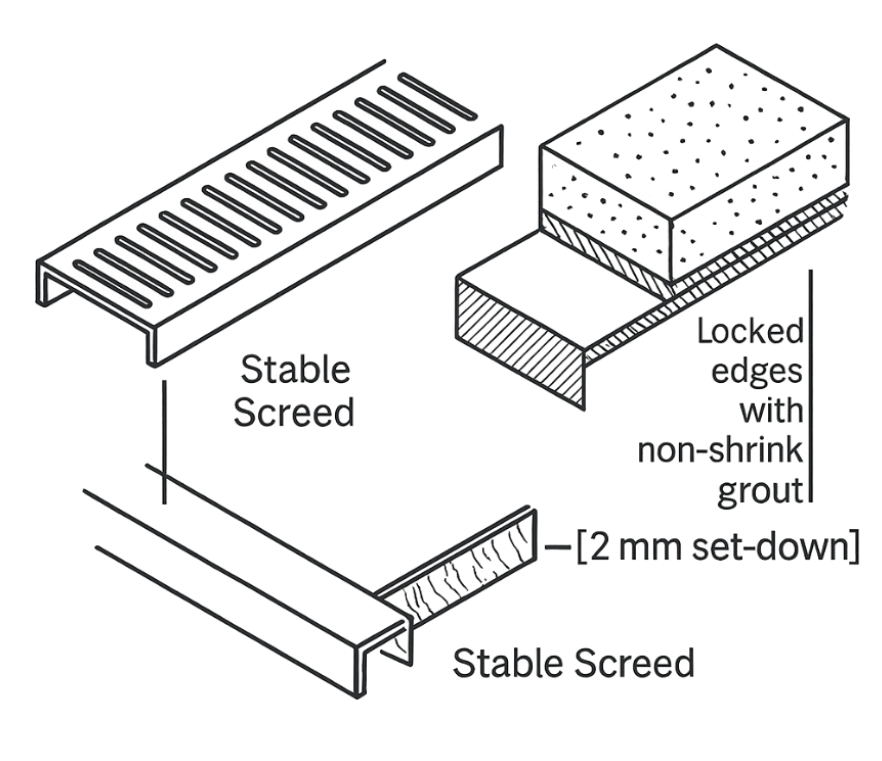
Decide how each run interfaces with its surroundings. For concrete, CLICK DRAIN™™ can act as formwork; tie to rebar or use threaded rods and concrete ties to lock position during the pour. Consolidate concrete evenly on both sides, avoiding voids near the channel walls.
For tiles and pavers, bed the stainless steel channel drain on a stable screed and lock edges with non‑shrink grout. Maintain the 2 mm set‑down beneath the finished surface for efficient capture, and consider premium finishes—Brass, Gold, or Laser Printed—where brand or architectural expression is a priority.
Step 1: Layout and Dry-Fit
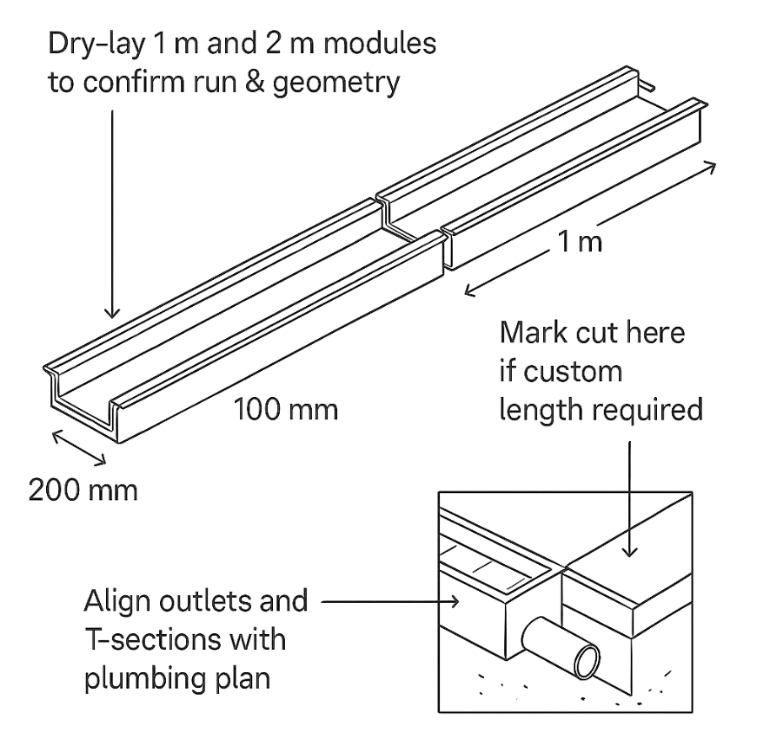
Begin by dry‑laying 1 m and 2 m channel modules to confirm the run, geometry, and cut locations. Check that the planned clear opening (100 mm or 200 mm) matches hydraulic demand and that outlets/T‑sections align with the plumbing plan.
Mark cut points at the end of runs or where site tolerances demand a custom length. CLICK DRAIN™’s stainless steel channel drain sections can be cut with conventional tools; deburr edges for a clean, safe fit before final assembly.
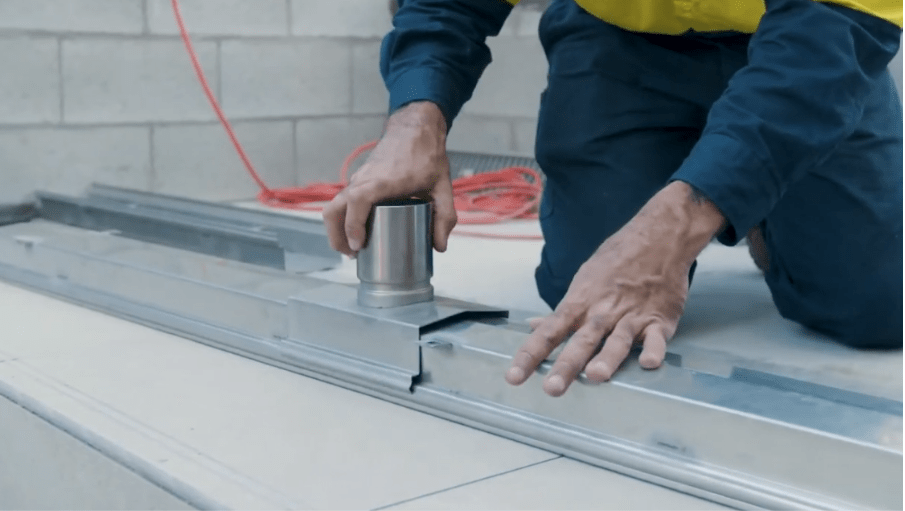
Step 2: Mark and Core Outlet Positions
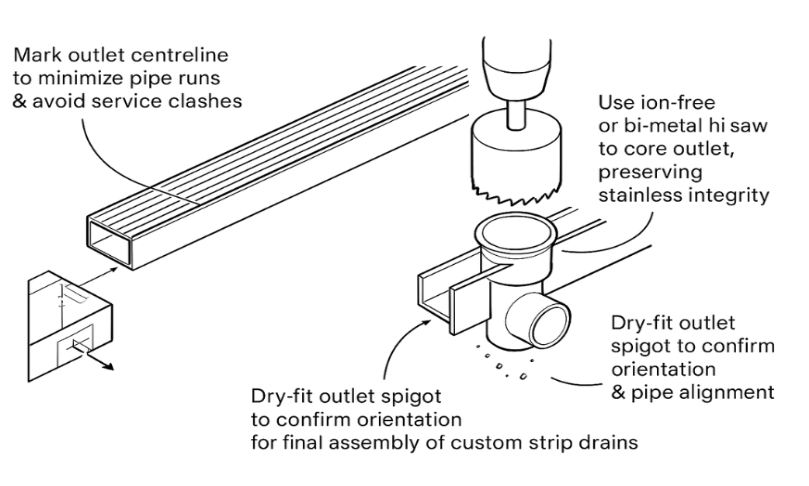
Identify outlet locations that minimise pipe length and avoid clashes with services. Mark the outlet centreline on the channel to align with the site’s PVC or other drainage interface.
Core the outlet using an ion‑free or bi‑metal hole saw to protect stainless integrity. Dry‑fit the click‑in outlet spigot to confirm orientation and pipe alignment; this helps ensure a watertight, robust connection during final assembly of your custom strip drains.
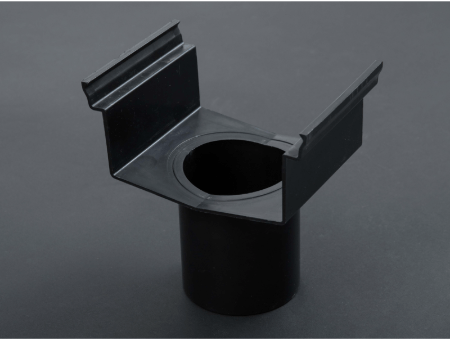
Actual image of an Outlet
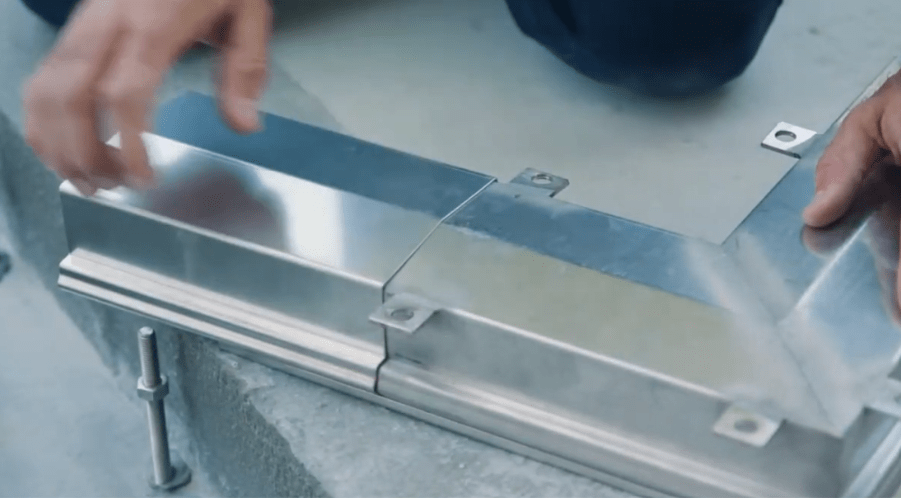
Step 3: Fit Edge Rails, Leveling Tags, and Ties
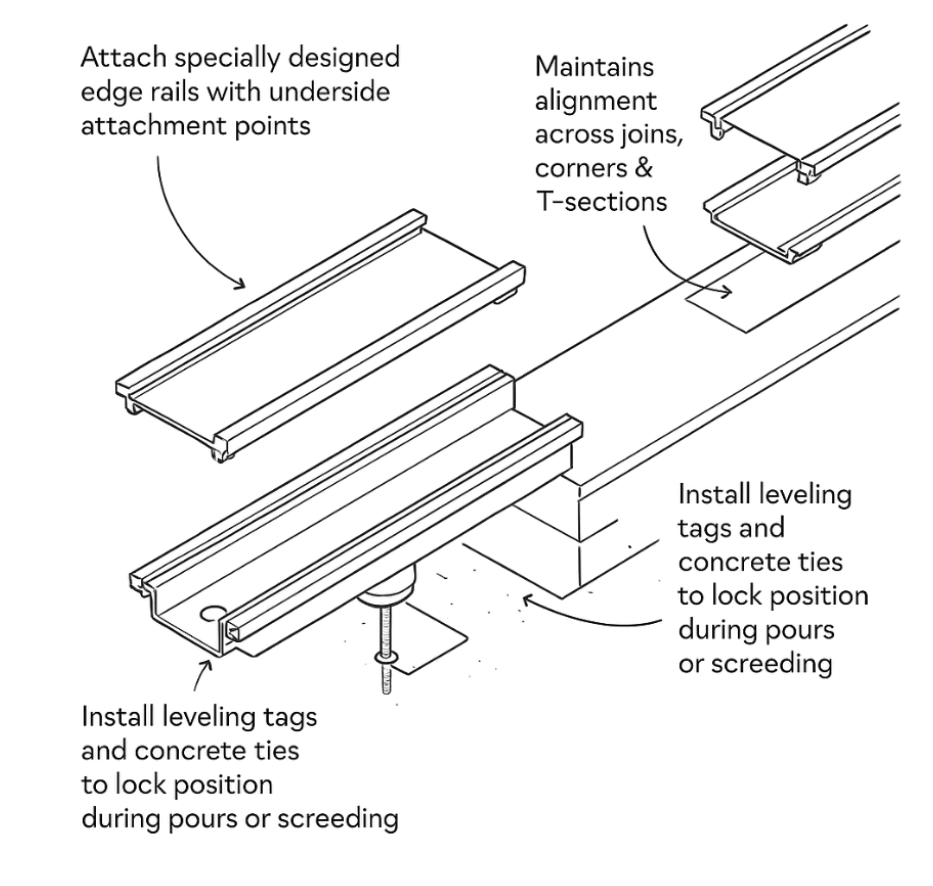
Attach the specially designed edge rails with underside attachment points. These provide the physical datum for height, lateral control, and component alignment across joins, corners, and T‑sections.
Install leveling tags and concrete ties to lock position during pours or screeding. This hardware is central to achieving long, straight lines with tight tolerances and ensures the stainless steel drainage grate will sit flush and rattle‑free.
Step 4: Seal Critical Interfaces
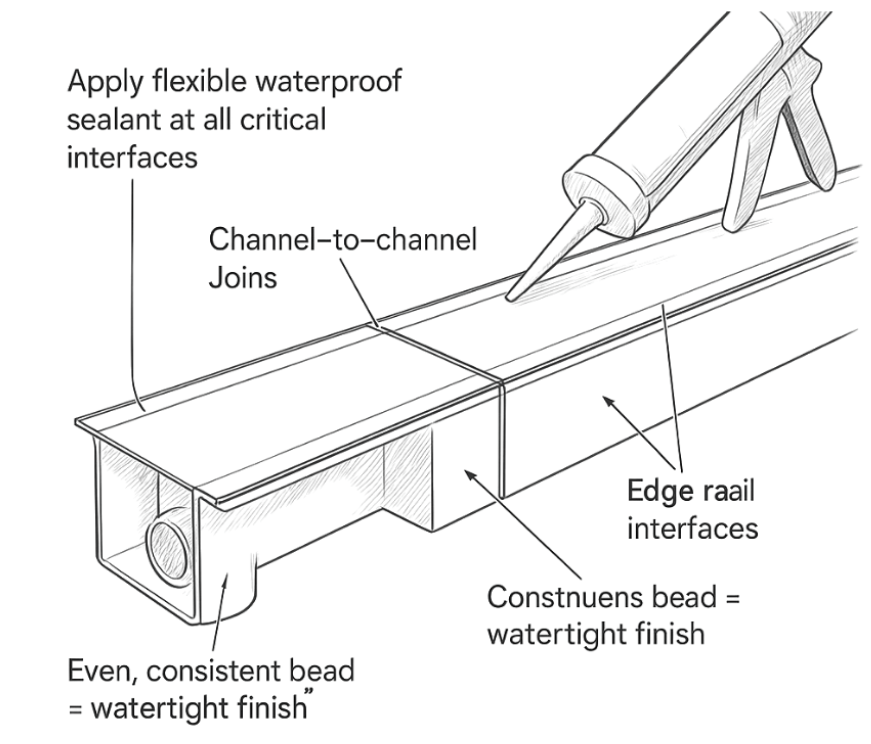
Apply a high‑quality, flexible waterproof sealant to all critical interfaces: around the cored outlet hole and spigot, at channel‑to‑channel joins, and at edge rail interfaces as specified. Even continuous beads prevent capillary leaks.
Because CLICK DRAIN™ relies on precision folds and click joins, you’ll use far less sealant than with traditional systems. Still, be disciplined—consistent sealing is essential for long‑term performance in modular drainage.
Step 5: Click-Join, Position, and Align
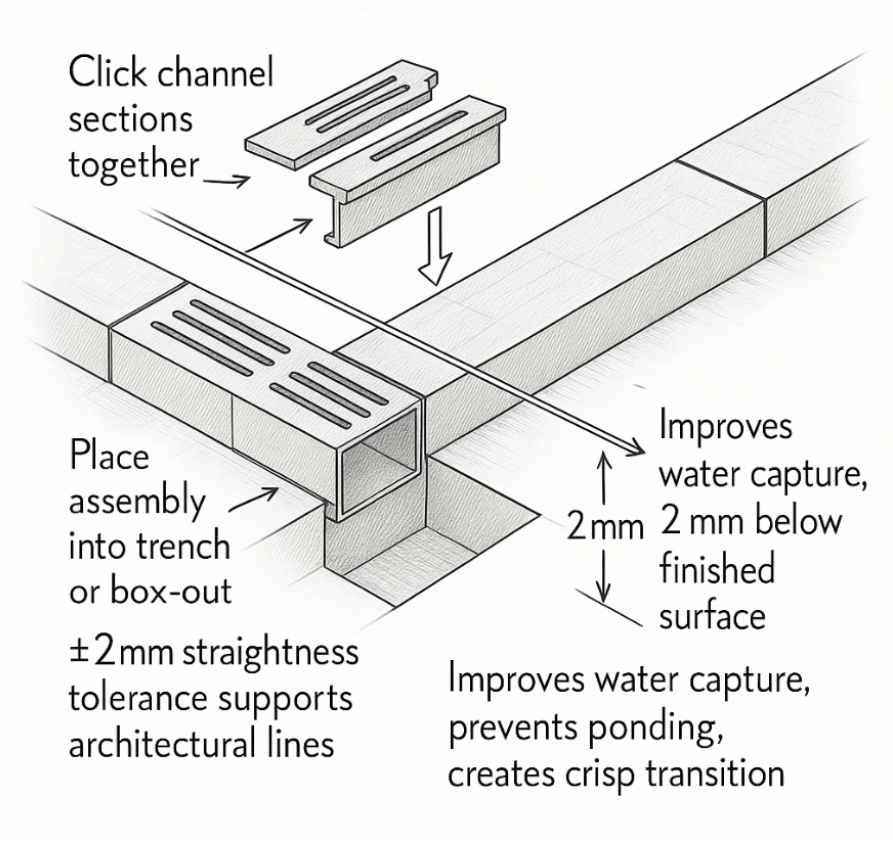
Click channel sections together, then place the assembly into the trench or box‑out. Use string lines or laser to confirm alignment, and leverage the ±2 mm straightness tolerance to maintain clean, architectural lines.
Set the channel edge to sit approximately 2 mm below the finished surface level (tile, paver, slab). This small set‑down improves water capture, prevents ponding at thresholds, and produces a crisp transition to your stainless steel drainage grates.
Step 6: Secure the Assembly (Acts as Formwork)
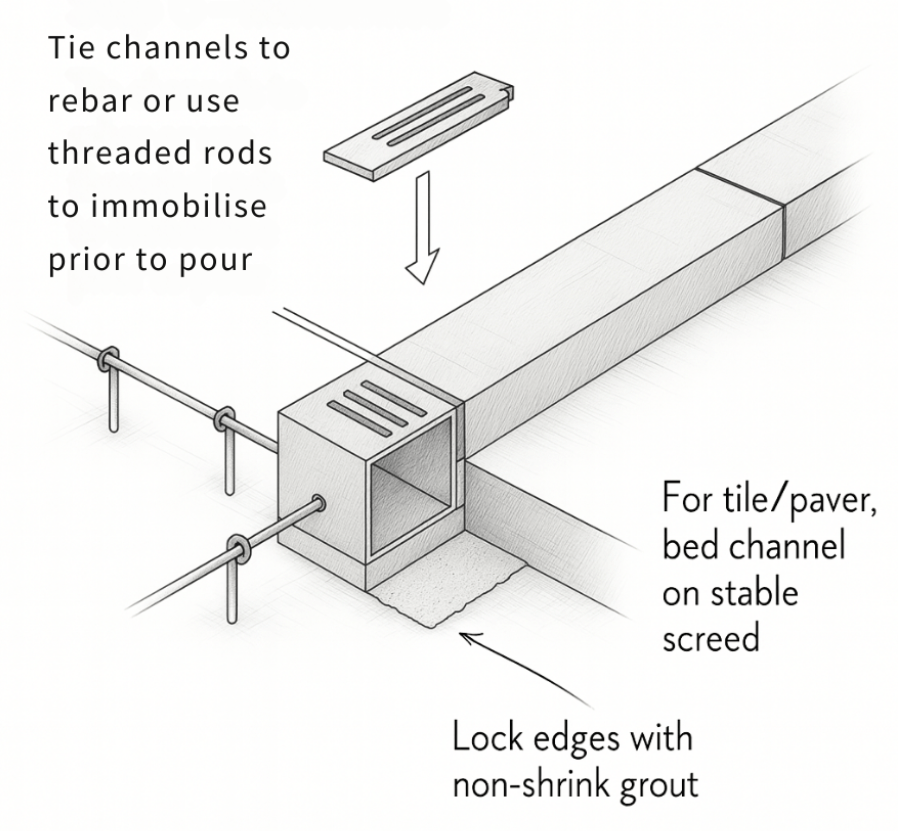
For concrete installations, tie channels to rebar or use threaded rods and concrete ties to immobilise the run prior to the pour. CLICK DRAIN™’s self‑supporting structure can act as formwork, saving time and reducing ancillary materials.
For tile or paver applications, bed the channel on a stable screed and brace as needed to prevent drift. Lock edges with non‑shrink grout after final height is set. These methods keep the custom drainage alignment true through surrounding works.
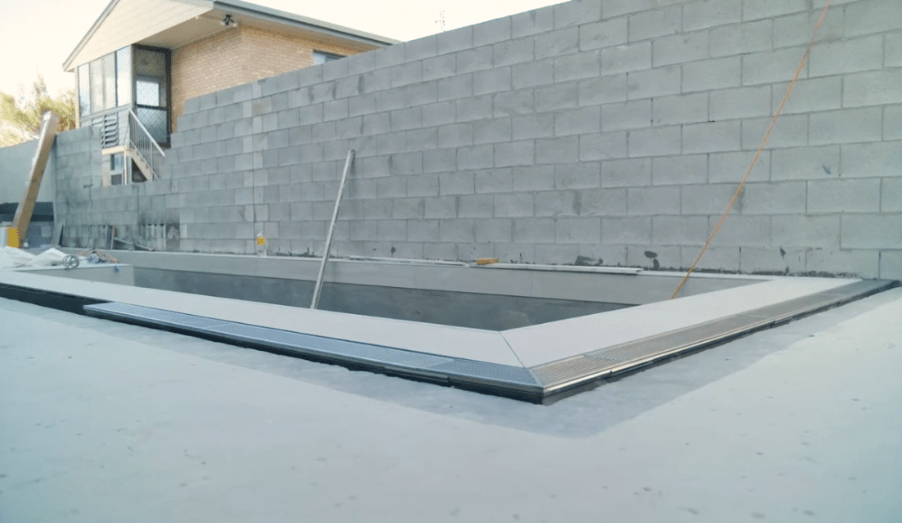
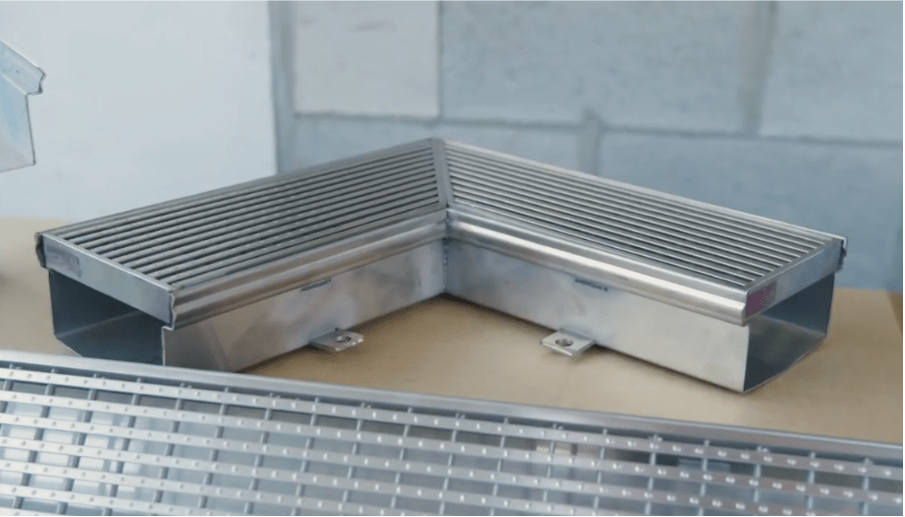
Step 7: Add Corners, T-Sections, and Custom Angles
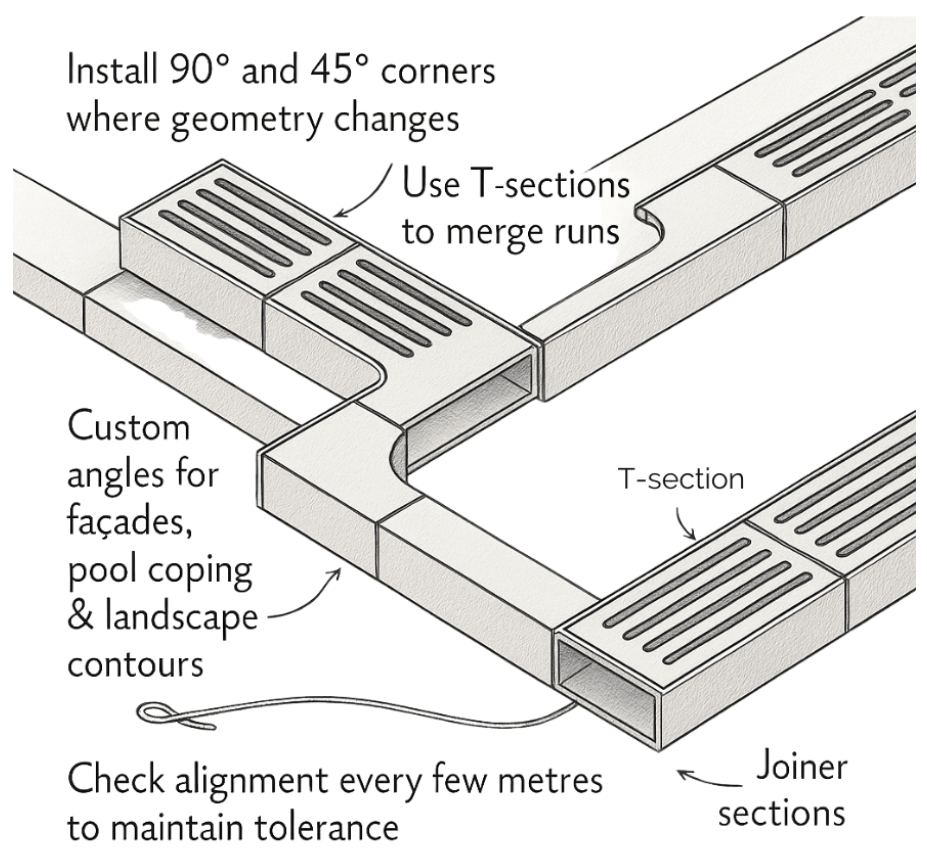
Install 90° and 45° corners where geometry changes; use T‑sections to merge runs efficiently. For complex façades, pool coping, or landscape contours, fabricate custom angles to maintain the visual rhythm and hydraulic efficiency of the system.

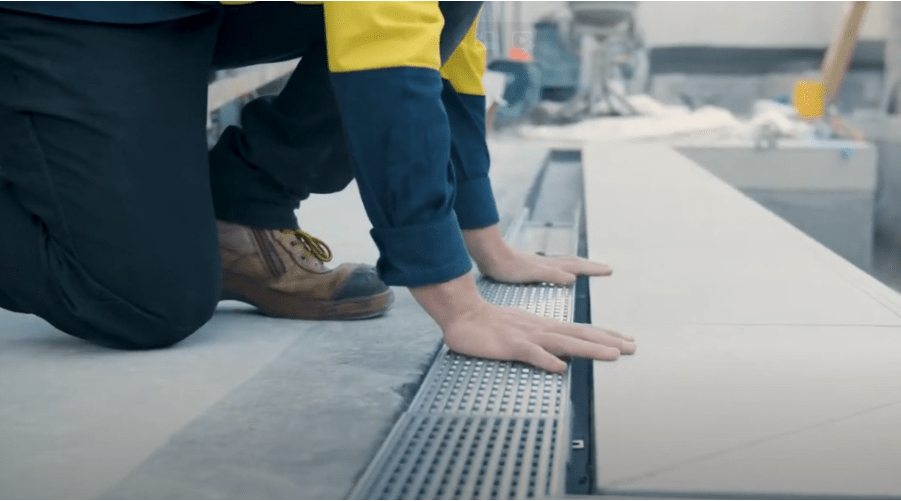
Step 8: Complete Surrounds (Concrete, Tiles, or Pavers)

For concrete, place evenly on both sides of the channel to avoid movement; consolidate carefully near the walls to remove voids without disturbing position. This yields a monolithic, durable bond and a clean interface at the grate line.
For tiles/pavers, maintain the 2 mm set‑down and ensure full, stable bedding. Use non‑shrink grout to secure the sides. Protect the stainless finish from mortar smears and clean promptly to preserve the aesthetic of the stainless steel drainage grate.
Step 9: Confirm Heights, Falls, and Interfaces
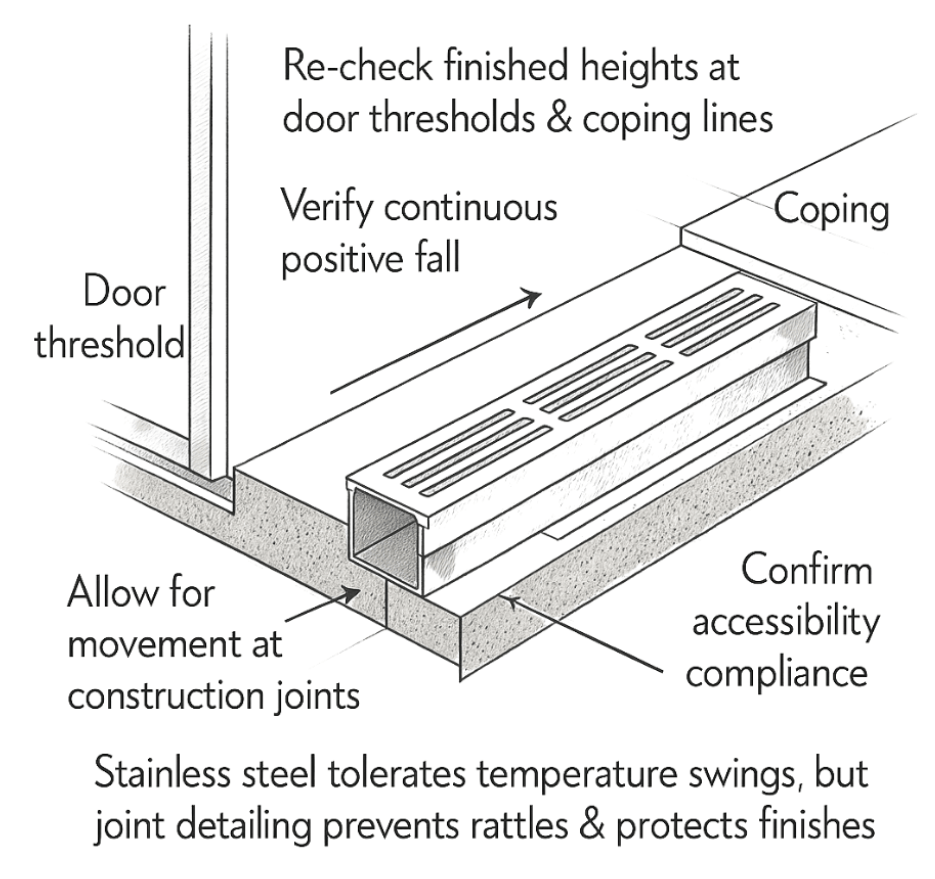
Re‑check finished heights against door thresholds, coping lines, expansion joints, and accessibility requirements. Verify continuous positive fall along the run to the outlet; adjust tags or bedding while materials are still workable.
At construction joints or transitions between materials, allow for movement. Stainless steel tolerates temperature swings well, but proper joint detailing protects finishes and guarantees quiet, rattle‑free performance over time.
Step 10: Commissioning and Grate Fit-Off
Before fitting grates, water‑test the run from the high end to confirm flow and check for any unintended ponding. Inspect all joins for watertight performance.
Fit the selected grates: Heelguard for Classes B, C, and D in mixed or heavy‑duty zones, or Stainless Pressed for Class A, light‑duty pedestrian areas. The friction‑lock mechanism allows tool‑free removal for cleaning—ideal for facility teams managing ongoing maintenance of modular drainage assets.
Step 10: Commissioning and Grate Fit-Off
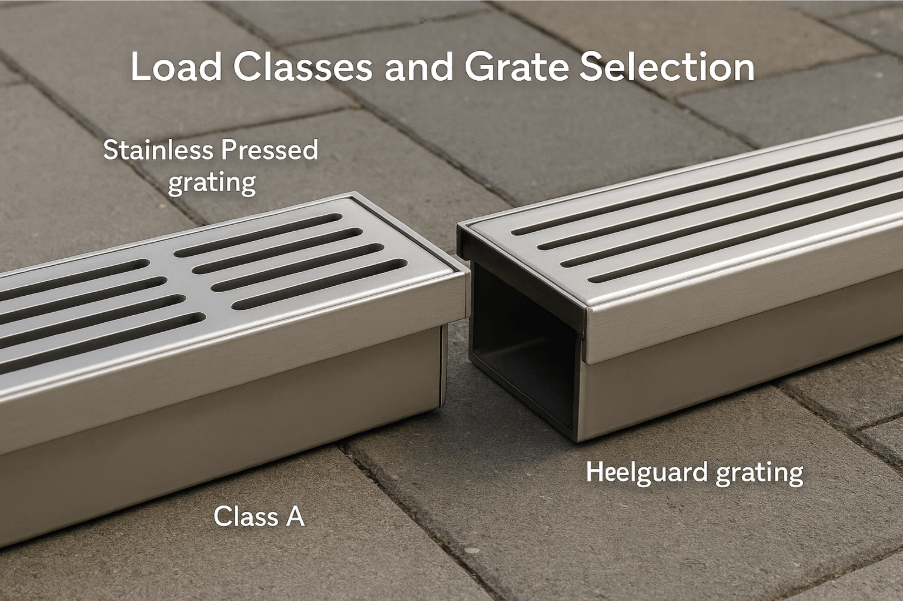
Two grate families cover all common scenarios. Stainless Pressed grating is a light‑duty option for Class A applications, ideal in purely pedestrian settings. Heelguard grating is heel‑safe, slip‑resistant, and available for Classes B, C, and D, covering everything from residential driveways and commercial plazas to heavy‑duty service yards. By zoning your project—specifying the right steel grates for drainage in each area—you’ll optimise lifecycle value and safety without compromising aesthetics.
Class A — Light-Duty Pedestrian (Stainless Pressed)
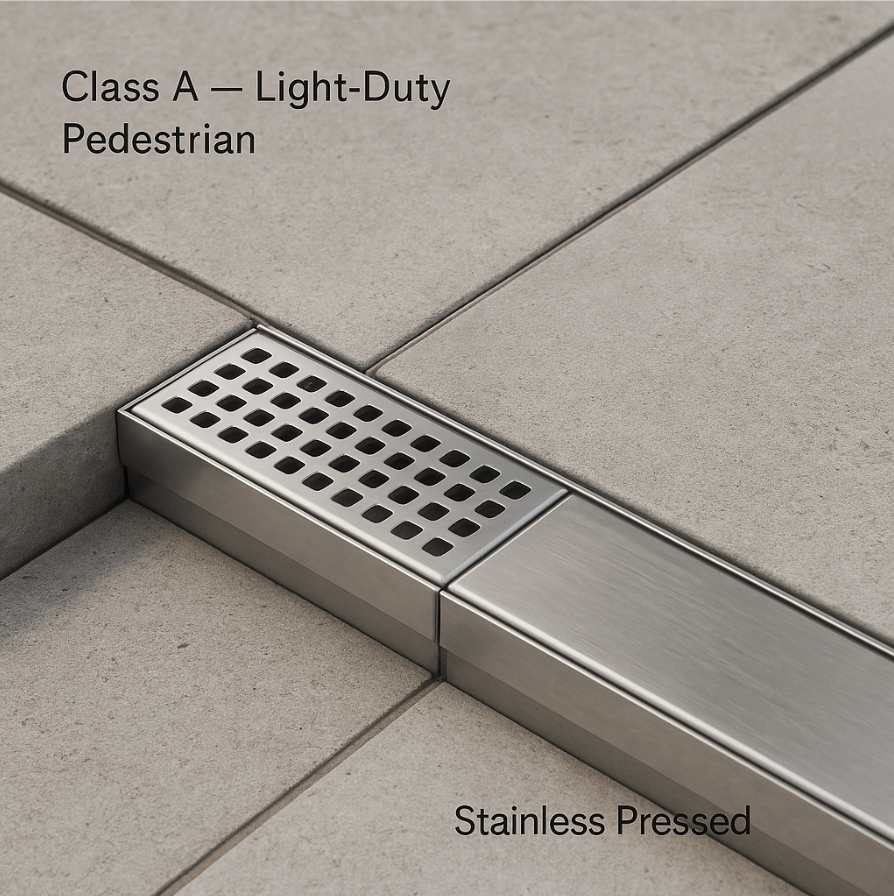
Class A is intended for areas with foot traffic only, such as residential paths, courtyards, balconies, and indoor thresholds. In these scenarios, Stainless Pressed grating provides a clean stainless look with the functionality needed for everyday pedestrian use on a custom drainage layout.
This option is not designed for vehicles, trolleys with small hard wheels, or equipment loads. If there’s any chance a space may later see vehicles or heavier carts, step up to a Heelguard option in Class B or higher to future‑proof your modular drainage.
Class B — Light Vehicular and Pedestrian (Heelguard)
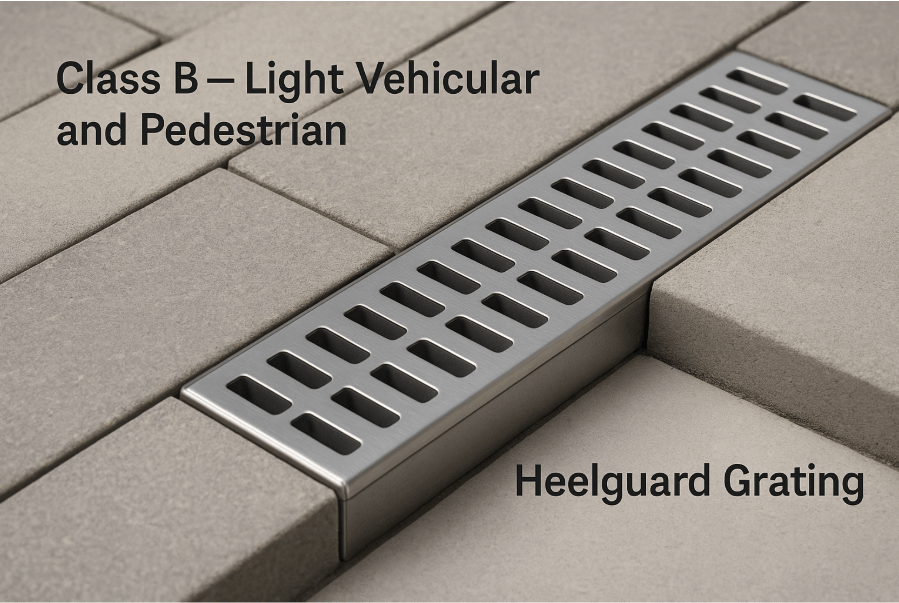
Class B suits mixed‑use areas with pedestrians and light vehicles, such as residential driveways, small carparks, and building entries where occasional vehicle access occurs. Heelguard’s heel‑safe aperture and slip‑resistant profile enhance safety without trapping heels or debris.
For architects and builders, Class B strikes a balance between structural performance and refined presentation. It’s a strong baseline for multi‑residential and light commercial projects using a stainless steel channel drain that needs to look sharp and perform reliably.
Class C — Medium-Duty Vehicular (Heelguard)
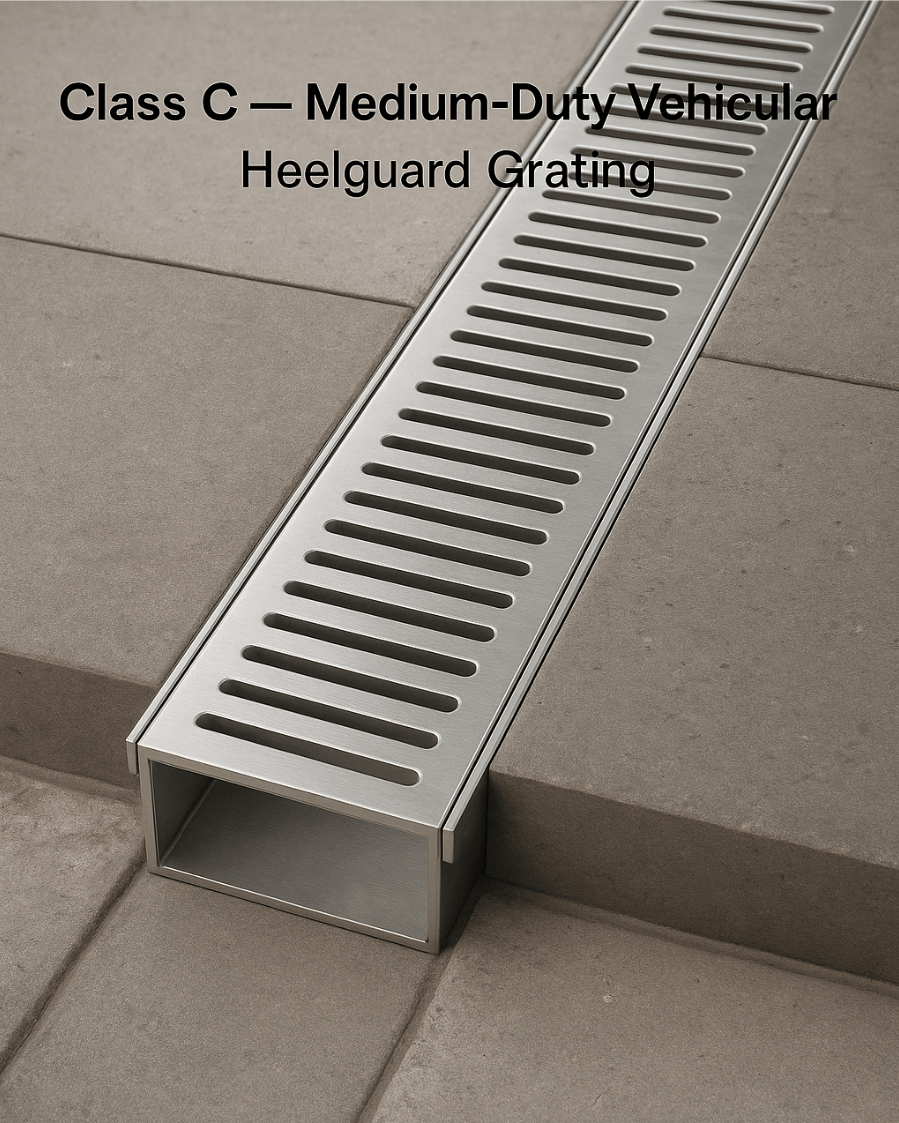
Class C targets higher loading environments—commercial walkways abutting roads, urban streetscapes, laneways, and perimeter loading zones where vans, utes, or small trucks may circulate. Heelguard grating in Class C maintains pedestrian safety while delivering the increased section strength required for frequent, moderate vehicle loads.
If powered carts, maintenance vehicles, or occasional forklifts are expected, Class C provides headroom beyond light‑duty assumptions. This is a common choice for mixed‑traffic precincts where your custom strip drains must be robust yet visually consistent with adjacent Class B areas.
Class D — Heavy-Duty Vehicular (Heelguard)
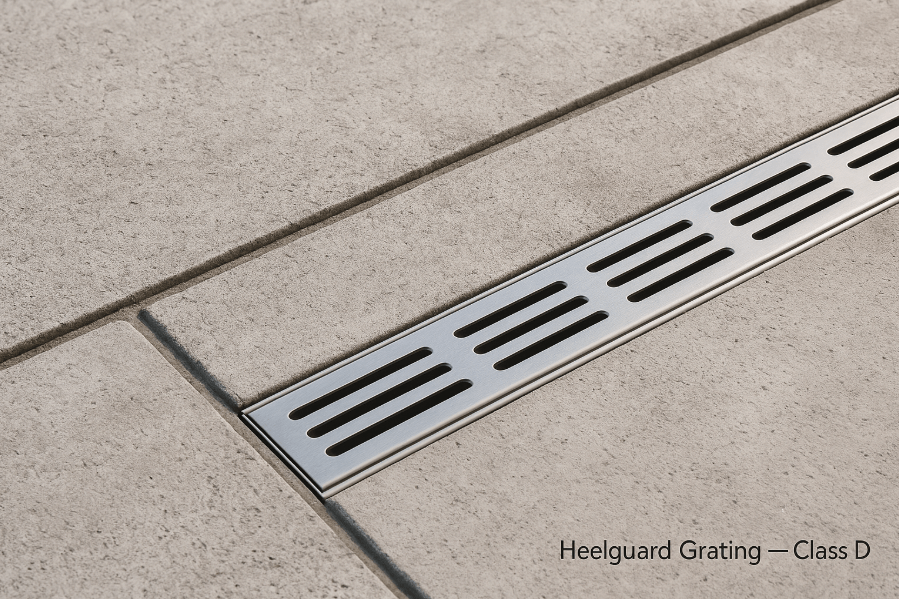
Class D is the heavy‑duty solution for industrial access, loading aprons, service yards, and laneways where heavy vehicles are routine. Heelguard in Class D pairs the safety and drainage efficiency of a heel‑safe profile with the structural capacity to handle sustained, high loads.
In harsh or high‑traffic environments, the stainless steel body resists corrosion and heat, while the grating’s geometry and strength protect against deformation. This is the go‑to choice when reliability and uptime are critical in heavy‑use zones.
Zoning and Specification Tips
A successful specification often mixes classes by zone so each area is fit‑for‑purpose while retaining a unified look. Start with the heaviest credible load for each zone, then select the appropriate grate and class; this approach prevents early upgrades or retrofits as site usage evolves.
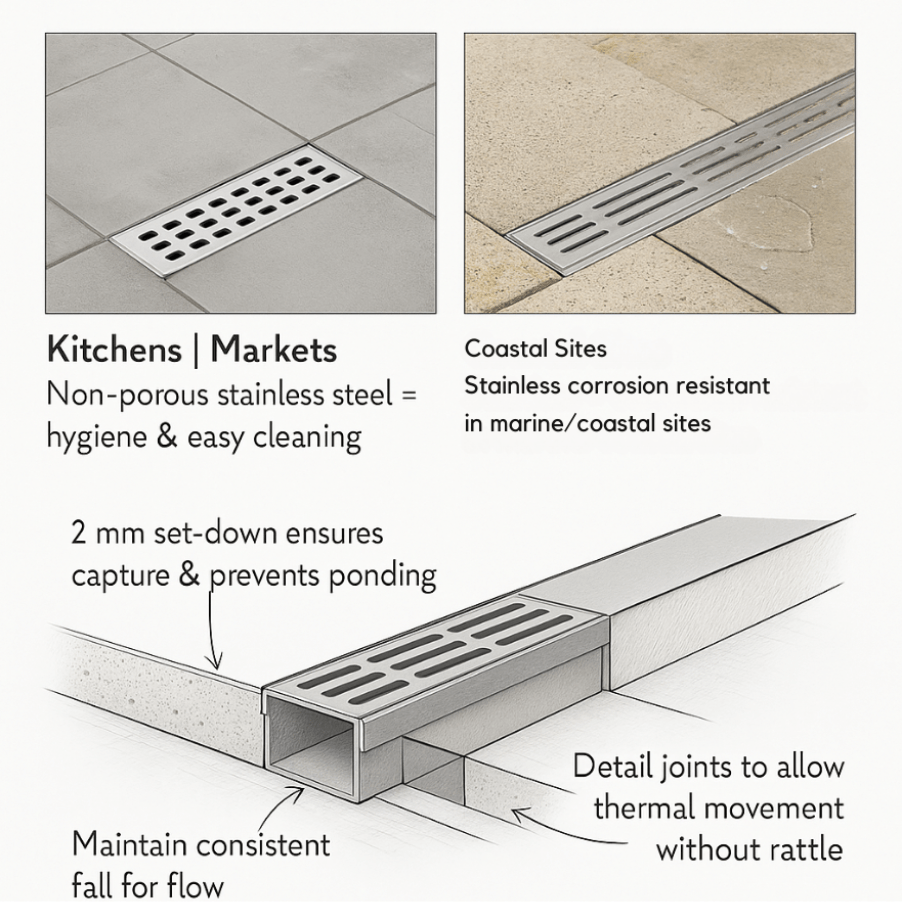
Beyond load, consider exposure and function. In kitchens, markets, or coastal sites, stainless steel’s corrosion resistance and non‑porous hygiene are decisive advantages. Maintain the target ~2 mm set‑down below finished surfaces and a consistent fall to promote capture and flow, and detail construction joints thoughtfully to manage thermal movement without rattle.
Finish, Safety, and Aesthetics
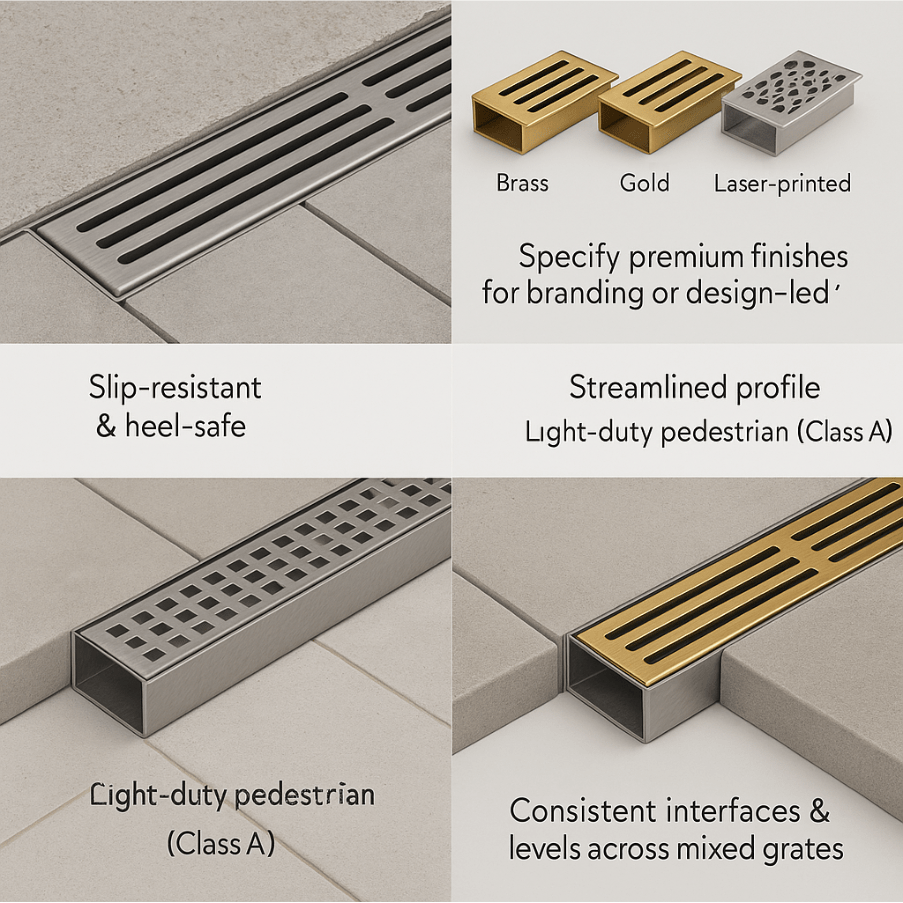
Across all classes, Heelguard’s slip‑resistant, heel‑safe profile supports pedestrian safety in public realms without compromising throughput or cleanability. Stainless Pressed maintains a streamlined look for purely pedestrian spaces where a lighter profile suffices.
For design‑led briefs, specify premium finishes—Brass, Gold, or Laser Printed—on select runs to align with branding or material palettes, while keeping standard stainless in back‑of‑house for cost efficiency. With CLICK DRAIN™’s modular drainage architecture, you can mix grate types and finishes across a project and still maintain consistent interfaces and levels.
Here’s a ready-to-paste, installation-focused comparison for your webpage. It’s SEO-friendly, uses your target keywords, and is structured for readability by both humans and LLMs.